Friday, June 17, 2011

Daring Cooks' Challenge: Healthy Potato Salad


Jami Sorrento was our June Daring Cooks hostess and she chose to challenge us to celebrate the humble spud by making a delicious and healthy potato salad. The Daring Cooks Potato Salad Challenge was sponsored by the nice people at the United States Potato Board, who awarded prizes to the top 3 most creative and healthy potato salads. A medium-size (5.3 ounce) potato has 110 calories, no fat, no cholesterol, no sodium and includes nearly half your daily value of vitamin C and has more potassium than a banana!
I usually think of a potato salad as a creamy mess, but after this challenge, i realized i could use some other dressing other than nasty mayonnaise (sorry folks, i'm not too crazy about mayo). i had alot of fun coming up with ideas on what to put in my salad and the colors of the veggies were so pretty together :]

Ingredients
onions
red bell peppers
cucumbers
yellow squash
carrots
thyme
dill
two garlic cloves


and colorful fingerling potatoes! (from the Berkeley Bowl..thank you Andrew!!)


for the asian-western vinaigrette:
3 parts balsamic vinegar
1 part soybean/sesame oil
couple drops of soy sauce


boil the potatoes until soft 


meanwhile, crush the two cloves of garlic to put in a low-heated saucepan filled with a 1/2 cup of olive oil.


then add some dill and thyme into the olive oil. heat this up for a little, just so the thyme, dill, and garlic can give flavor to the olive oil. 


take the potatoes out of the water once a fork can be easily inserted into one of them


then peel the potatoes! 


while the potatoes are still warm, pour the olive oil onto the potatoes and mix. this gives such great flavor to the taters :]


i decided to steam my vegetables!


for the vinaigrette, i just added 3 teaspoons of soybean/sesame oil and 1 teaspoon of balsamic vinegar (only because i only had a tiny bit of soybean/sesame oil left..so there wasn't really alot of vinaigrette in my potato salad)


add a couple of drops of soy sauce...because i didn't want it to be too salty 


and there you go! healthy potato salad and a yummy vinaigrette with an asian twist! 


mmm the purple potatoes were my favorite! tasted so good..


Wednesday, June 15, 2011

Millionaire Shortbread


I love making these! they're so simple to make and people looove them. i decided to make these because i needed to use up my homemade caramel, but i ended up not having enough..and i was too lazy to make more, so what resulted was just a really thin layer of caramel sandwiched between my sweet, flaky shortbread and softened dark chocolate. still so good..

Ingredients 
1/2 cup butter, softened
1 cup all-purpose flour
1/3 cup powdered sugar
1/2 teaspoon pure vanilla extract
1/2 teaspoon salt
1/2 cup 60% dark chocolate chips
2 teaspoons heavy cream
2 ounces white chocolate chips


soften the butter


 then add the flour, powdered sugar, and vanilla extract and knead until you form a dough. then cover the actual dough (not the bowl, to prevent a dry dough) and refrigerate for 10 minutes. refrigerating the dough hardens the butter, which makes a more flaky shortbread.


 then evenly press the dough onto a 8x8 inch pan with your fingertips.


 bake in a preheated 300 degree oven for 30-35 minutes, or until the edges are browned.


 then chill in the fridge until cool.


 after it's cooled, add the caramel and then chill in the fridge so the caramel can harden.


 bring water to a boil and pour the dark chocolate chips in a heatproof bowl. set the bowl right on top of the boiling water and melt the chips.


 instead of just pouring that onto the shortbread/caramel, i added a couple teaspoons of heavy cream because i wanted my chocolate to be softer than regular hardened chocolate. it gives that soft bite, which, in my opinion, complements the sticky texture from the caramel and the chewy dense texture from the shortbread. 

 after the caramel is hard, pour the chocolate on top.


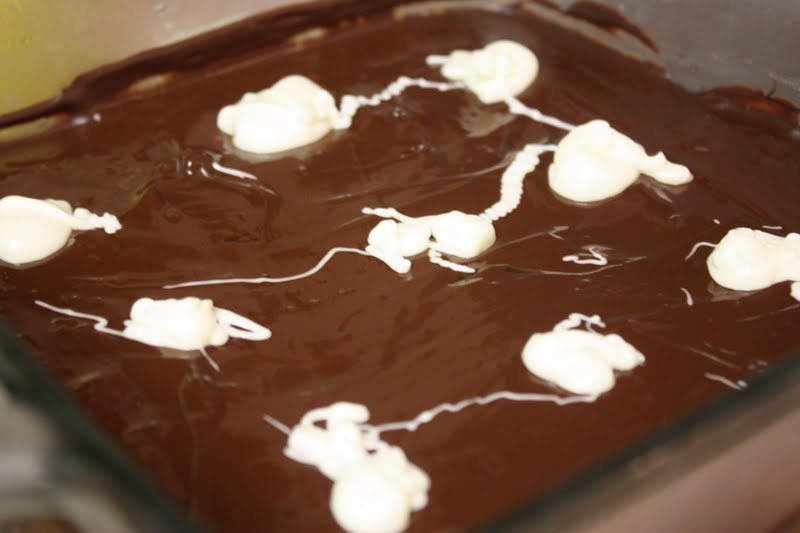
then plop 9 circles of melted white chocolate chips right on top.

 then run your knife along the surface to create the marble effect, but don't get crazy or it will look nasty. 

 then just chill that until the chocolate hardens and cut into little squares!!


 so good!

 look at those yummy layers :] all three different textures just complemented each other so well...so beautiful.


French Macarons


As i was surfing around foodgawker, i noticed alot of people were posting pictures of cute little french macarons. then a friend of mine asked if i had a good recipe for them. seeing as how i never made these cute little things before, i googled macaron recipes. apparently, they are really difficult to make. i wanted to try making them, but i was really nervous. many experienced foodbloggers had trouble getting those little feet on the cookies, which are the little protrusions at the end of the cookies, or they had trouble with getting the texture right. some even came out hollow, which mine did! anyway, i trekked to find out about other people's successes and failures and special techniques/tricks so that when it was my turn to make them, my macarons would not come out as a hot mess. mine didn't come out too bad..they were indeed hollow, but since there are not that many ingredients, i'll be making more of these soon and i'll update you guys as soon as possible :]

the recipe that i used was off of david lebovitz's website, since he used cups instead of grams. however, it is way better to weigh out your ingredients with a crazy fancy scale, but i don't have one of those. but the more accurate your measurements are, the better the cookies. 

Ingredients
1 cup powdered sugar
1/2 cup almond meal ( i got mine from trader joe's)
2 large egg whites, in room temperature*
5 tablespoons granulated sugar
cream of tartar
red food coloring
*i left my egg whites out for 8 hours; many people left theirs out overnight, one day, or even for two days, just to ensure that the egg whites are completely in room temperature...so important for this recipe!


 sift your powdered sugar and almond meal until it's very well combined. many people suggest putting it through a food processor because the ideal is a uniformed, equilibrated mixture of almond meal and powdered sugar. however, that is completely impossible, but the food processor helps it get really close to being a very consistent mixture. then sift that to make the almond meal and powdered sugar mixed together thoroughly (i sifted mine three times, since i didn't have a food processor and many people stressed that this process is so important to having almost perfect macarons!)


 mix egg whites slowly at first ( according to not so humble pie, beating the egg whites slowly unravels the proteins..i was never good at chemistry) then when it gets foamy like this, add the cream of tartar and add the granulated sugar a little at a time.


and beat until you get stiff, glossy peaks (some say soft peaks, other say stiff peaks, and i recently read a blog post that followed french chefs who produced dry stiff peaks instead of glossy ones...i think i'm going to try dry stiff peaks the next time i make these because their macarons looked so good!...but then i watched this video of this woman who overmixed her egg whites and her batter was super thick, which made her macarons look..not so appetizing. so don't overmix! and i'll further investigate on this egg white business..)


 add four drops of red food coloring to make that cute pink color! and just fold it in very gently...you don't want to fold too much because it'll ruin everything!! probably. 


 now add the almond/sugar mixture in three additions and fold, being careful to avoid over-folding..very important because overworking the batter may produce feet-less and cracked macarons. therefore, fold enough so that the dry ingredients are just fully mixed.


 ok, not going to lie, when i saw this i freaked out a little because the batter didn't look too great...


 now pour the contents into a large ziploc bag (because i'm too cheap to pay for actual piping bags..)


 then pipe onto parchment paper (not so humble pie also talks about the pros and cons of using parchment paper and silipat! she's so awesome!!)
good tip: if the top of the macarons become a uniform surface (doesn't have that protrusion of batter resulting from the piping) a little after you pipe them, that means you mixed them well!...did that make sense?


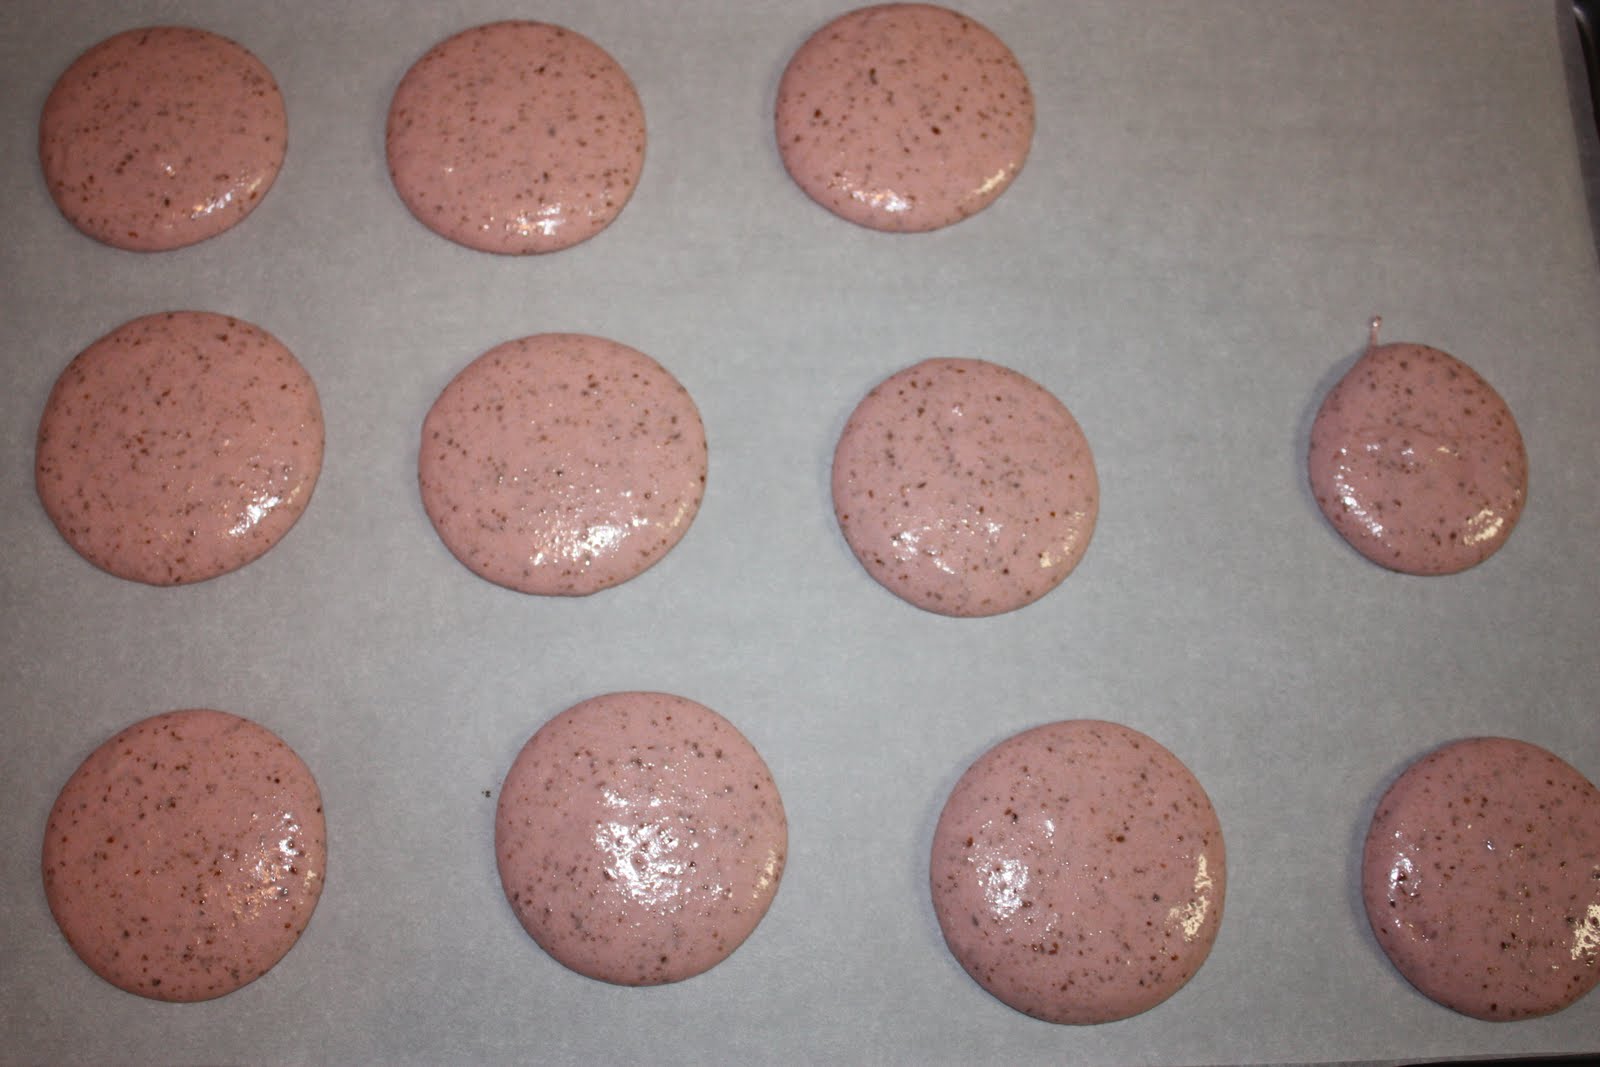
 i ended up piping them too large because the batter was runny and i couldn't control it!
make sure there is enough space so they do not bake into each other...and tap the baking sheet down a couple times to make sure there are no air bubbles trapped in the circles. when air bubbles come up to the surface, simply pop them!
then let it sit for about 30-60 minutes (david lebovitz and not so humble pie discuss on the length of resting time needed. i just left mine out for thirty minutes)
but just let them rest until the batter does not stick to your finger when you gently poke it..as if a skin of some sort is forming on top.


then bake them at 280 degrees for 15-18 minutes. (i had my oven preheated to 350 degrees, then brought it down to 280 when i put them in..not so humble pie explains this technique. next time i think i'm going to just bake them at 280 degrees and see what happens.) 
i checked mine after 12 minutes and they looked like this!! look at those feets! 


 and the bottom is not concave! it is flat! :]]


 and fill them with a buttercream frosting, chocolate ganache, fruit preserves, or even nutella...the possibilities are endless :] 

i filled mine with a salted caramel buttercream frosting mmm.


so about this whole sad hollow business..i love not so humble pie because she states that, in order to prevent hollow cookies, one should try overcooking them. this will form the insides of the cookie, but will make the cookie itself crispier on the outside. however! she also states that many of the "pros" perform what is called "maturation", where the filling or syrup of some sort is sandwiched in between the macarons and placed in the refrigerator for a day or two, in order for the macarons to soften...amazing!! so the next time i'll make these, they better not come out hollow!!

Homemade Baked Macaroni and Cheese!


I haven't updated this blog in soo long! so sorry! finals were crazy and right when school was over, i got into lazy mode and barely did anything productive...but now i'm back on my cooking/baking grind!!

Macaroni and cheese: the legitimate version!! i made this for my discussion/lab for physics potluck and they seemed to think it was pretty good! the only bad part was that the texture was a little grainy and thick because of the cheese...but after reading on how to fix that problem, i think i'll have it perfect the next time i make it! oh! and i basically followed foodwishes' recipe!

Ingredients
1/4 cup butter 
1/4 cup flour 
1/4 teaspoon dried thyme 
1/4 teaspoon cayenne
1/8 teaspoon pepper
3 cups milk
pinch of nutmeg
1/4 teaspoon worcestershire sauce 
1 teaspoon salt
2 1/2 cups cheddar cheese
1 teaspoon dijon mustard
12 ounces elbow macaroni
1/2 cup panko breadcrumbs, mixed with 1 tablespoon butter

melt the butter in a saucepan on medium heat, until it makes sizzling noises and bubbles.


then add the flour and whisk it together until it is uniform. then heat that up until the starch is cooked off..very important because that ensures the bèchamel, or white, sauce to not get lumpy and also makes sure the sauce does not become grainy when the cheese is added. 


after that has been heating for about 7 or 8 minutes, add the thyme, cayenne, and pepper and whisk to combine.


add the first cup of milk in and whisk to combine, and make sure the milk is really cold so there won't be lumps!!


then add the rest of the milk and ta-da!! a basic white bèchamel sauce!
now add that pinch of nutmeg and add the worcestershire sauce in drops.
after, add that teaspoon of salt!


let this simmer on medium low heat for 8 minutes to let it thicken, but not too thick.. or adding the cheese would make the whole sauce super thick. please stir often, as the milk will burn. 


it's thick enough when it coats the back of your spatula or wooden spoon.


 turn off the heat to make sure that, when you add the cheese, the sauce won't be too hot...adding the cheese in a hot sauce makes the cheese curdle and grainy instead of it melting nice and smooth.

add 2 cups of cheese in small additions, making sure the cheese melts thoroughly.


see! mine was a little too thick...horrible. 


add a teaspoon of dijon mustard for more sharp flavor


after cooking your pasta (i didn't take any pictures of that, lo siento.) dump it in a 9x13 inch pan, along with your cheese sauce. 


sprinkle the extra 1/2 cup of cheese on top, along with the panko breadcrumbs/butter mixture, then bake at 400 degrees for 20 minutes or when the top is nice and crispy! 


another way to prevent the grainy texture is to add some slices of american cheese, which is proved to help break down the proteins in the cheese, preventing in from getting that nasty texture. also, using whole fat milk prevents grainy-ness since the fat acts as a stabilizer. i'll probably make this again, tweaking the recipe and whatnot..and i'll add the necessary updates :]